[FFXI] Jasmint's HD Textures Installation Guide
Installation Guide: XIPivot
If your launcher of choice doesn’t include XIPivot by default, please download it from the GitHub page .
Windower 4
-
Navigate to
Windower/addons/XIPivot/data/DATs/and create a new folder called Jasmints_HD_textures (or anything else appropriate, just make sure there are no spaces in the name). -
Extract the contents of the downloaded archive(s) into the folder created in step 1.
If you are using an older version of this mod without the top ROM folder, please create the ROM folder first, enter it and then extract the mod contents. -
Go up to
Windower/addons/XIPivot/data/and modify settings.xml to include the folder name created in step 1 within the overlays section.
To avoid conflicts with other texture packs (particularly those that contain other character textures), place my mod first or after UI mods in the list. This ensures that it is loaded before other potentially conflicting packs. -
Zone if the game is running, and you should see your new character textures.
Steps 2 and 4 can be repeated for updating the textures while the game is running.
When it’s not running, simply extract the new archive contents into the same directory created in step 1 and replace what’s there. The updated textures should be present the next time you start the game.
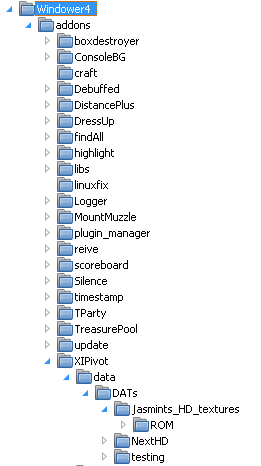
The structure should look something like this:

Your settings.xml file in Windower/addons/XIPivot should look something like this:
<?xml version="1.1" ?>
<settings>
    <global>
        <overlays>testing,Jasmints_HD_textures,NextHD</overlays>
    </global>
</settings>
Keep in mind that the earlier the overlay is mentioned, the higher priority it is (ie it will overwrite the ones listed after it).
Please note that UI and sound mods cannot be installed via XIpivot with Windower 4 and Ashita v3, as they won’t work - you need to overwrite your game files directly
, as these types of mods are not loaded early enough to take effect.
Currently, only Ashita v4 can load these types of mods with XIPivot.
Ashita (v3):
-
In game, type
/load xipivotand check what directory XIPivot is looking in for the mod (eg../plugins/DATs). -
Create a new folder called
Jasmints_HD_textures(or anything else appropriate, just make sure there are no spaces in the name) within the folder that XIPivot is checking. -
Extract the contents of the downloaded archive(s) into the folder created in step 2.You should now be able to see the directory named in step 2 in the XIPivot menu.
If you are using an older version of this mod without the top ROM folder, please create the ROM folder first, enter it and then extract the mod contents. -
Click the button next to the directory name to make it an active overlay.
-
Zone and you should see your new character textures.
To update the textures, simply extract the new archive contents into the same directory created in step 2 and replace what’s there. If you’re doing this while the game is running, zone and you should see the updated character textures.
Ashita (v4):
Ensure you have your polplugins folder set up correctly.
From there, place the textures into their own folder as usual and load. You can use /pivot in-game to manage your overlays.
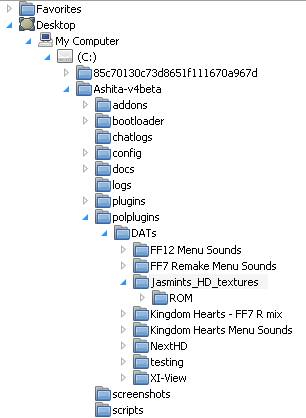
The structure should look something like this:

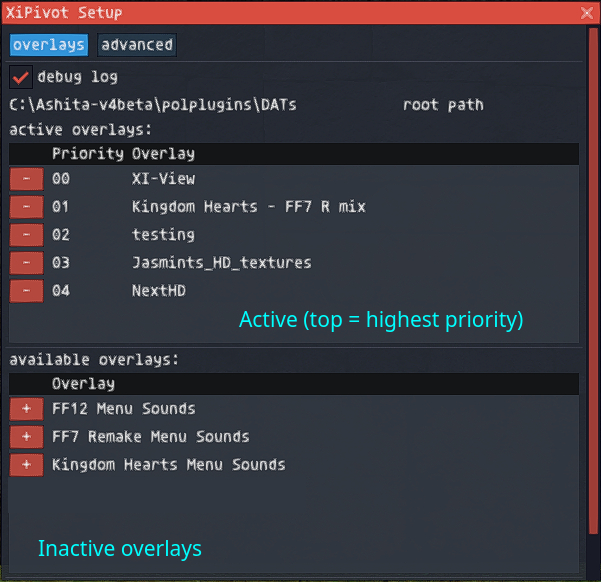
Here’s how the /pivot menu works:

In this example, the testing overlay takes priority over my HD textures, thus overriding them.
By the way. if you use any sound and UI mods like XIview, I cannot recommend Ashita v4 enough! You don’t need to overwrite the game files, unlike with Windower 4 and Ashita v3.
Installation Guide: vanilla
This involves overwriting the original game files.
Please understand that if the game updates, there is a chance that my mod will be overwritten. In addition, if you ever need to repair your install, FFXI will think that my mod files are ‘corrupt’ and will attempt to replace them with the vanilla versions. If the mod files get replaced by an update etc, get the latest files and replace them again. You’ve been warned!
-
Navigate to your FINAL FANTASY XI install (eg.
C:/Program Files/PlayOnline/SquareEnix/FINAL FANTASY XI) -
Place the contents of the archive in there (ROM folder if your version doesn’t include one).
-
If your download only contains folders with number names, as was the case with older versions of this mod, open up the ROM folder and place the contents there.
These steps may be repeated with other mods.
Enjoy game! 🎉
Troubleshooting
I typed /pivot and nothing’s happening!
Please ensure XIPivot is loaded. This is usually done with /load xipivot in-game, or in your script/init file.
Is your mod compatible with other graphical mods?
Yep! However, make sure that if your other mod changes faces, that my mod is higher in the priority list - otherwise, your other mod will be used.
I’ve got all these amazing mods, yippee! But why do I sometimes zone into a black void…?
Because FFXI is so ancient, it is not large address aware (ie it will only use 2GB VRAM max). This means when the game runs out of VRAM, you’ll zone into a black void.
The only way to fix this is to patch your pol.exe or xiloader.exe with a large address aware
patcher. This should allow the game to use 4GB VRAM.
Even then, if you are running content with a large group, it is recommended to use less heavy mods to avoid this issue.
I also recommend looking into dgVoodoo2 or another Direct3D8 to Direct3D9 proxy to possibly improve performance, and also open another avenue for graphical improvement. My other article Getting vkBasalt Working
touches on this a bit, though it’s mainly written for people who want post-processing to work (ReShade).
